Wednesday, August 17, 2011
 Tutorial on Coloring A Black n White Image
8:12 AM | Posted by
Joanie |
Edit Post
Adding Color to a Black n White Image
using Paint Shop Pro
This tutorial was written by me, Joanie Kadi-Riley (aka RyLee) on August 17, 2011. Any resemblance to any other
tutorial is purely coincidental. Please do not copy, rip or claim as your own. You may use my tutorial in a forum or group, but
please Link back to my blog...do not copy/paste!
This is how I color an image...may not be the right way or an easy way, but this works for me!
Remember, your best friend(s) in PSP, is the "undo" the "delete" and the "zoom in" button!
Very, Very Important! Remember to SAVE often! I usually save after each section I complete.
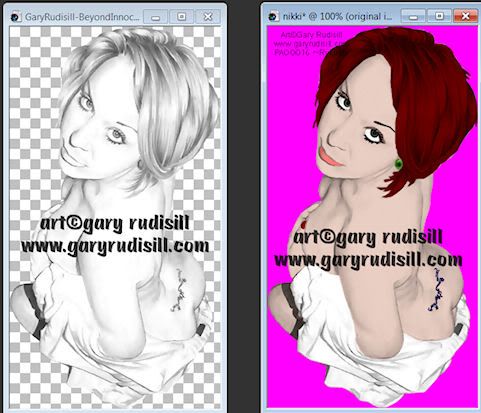
I am using a black n white image "Beyond Innocence" by Gary Rudisill
which can be purchased at Cherry Gurlz. Make sure you have a license number
before using any artwork.
*If you are using an artist other than Gary Rudisill, please make sure that the
artist allows coloring of his/her black n white images*
~What you will need for this tut:
I am using PSPX2, but any version of PSP will work.
Very helpful to have a color wheel or HTML website open...it's easier to look at and pick a color, especially a flesh tone.
This is the website I usually have opened for color codes
a black n white image
A must have - music, coffee, and patience
Are you ready to start????
Take a deep breath, exhale :)
Open up the image in Paint Shop Pro.
Shift-D to make a copy, minimize the original.
Add a new layer, move to the bottom of the tube,
flood fill the new layer with a dark color...doing this will help you see the outline of the image.
Select your "freehand tool" or "lasso tool",
you can tweak this to your liking.
I find it best to "zoom" in on the image as much as you need too to see all the little stray pixels, lines. etc.
*Make sure you zoom in before you start using the lasso tool, you will not be able to zoom in while outlining.
You can start anywhere you want, I usually start at the top, (head) and work my way down.
*Make sure you don't double click until you have outlined the area you are working on, if you do, you will have to start over.* Not fun!
Using the "freehand tool" or "lasso tool" start "outlining" the hair, taking little sections at a time.
(if you go off the line a bit, hit your "delete" key until you are back to the area before you goofed.)
Once you are done outlining,
Add a new layer above the main image, rename this "hair".
Choose a color of choice for the
hair, flood fill the new layer with that color, Selections/Select none.
In the layers palette, change the "blend mode" to multiply.
this will allow the shading from the original image to come through.
You can play with the blend modes to your liking..sometimes "overlay" works well also.
This is where I would start saving...after each color is added.....trust me...I found out the hard way....I was almost done
with an image when our power went out....I cried because I didn't save it and had to start all over.
Save as a psp.image..continue to your next area.
In the layers palette, highlight your b/w image, select the next area you want to color.
Take your time, and outline your next area.
Add a new layer, rename this layer.
Flood fill with choice of color, change the blend mode to multiply,
Selections/Select none.
SAVE as a psp.image....continue to your next area.
Keep working your way down. I usually do all the small parts first, eyes, lips, etc.
I end up doing the body last.
Choosing a "flesh" color is usually the tough part for me...lol.
Add new layer above your original b/w image,
flood fill with your flesh color, change blend mode to multiply, Selections/None.
*You will notice that when you add the flesh tone to the image, the other colors get distorted....
this is what I do, and it works for me, time consuming maybe, but it works.
start at the top, ie. hair, highlight the hair layer, Selections/All/Float/De-float,
highlight the layer you added the flesh color too, hit the delete key. This will remove the flesh color from the hair layer.
*Repeat this step for all the layers.
Before you delete your bottom layer, (the flood-filled layer), check your image.
If you find that you may have colored outside the lines a bit
don't panic, easy fix....
*right click on the top bar of the image, copy merge and paste as a new image,
Selections/All/Float/De-float/Modify/Contract by 1/Invert/hit delete key.
this will clean up your image a bit and get rid of any stray pixels.
Another quick tip....
when all done, right click on the top bar of the image, Copy merge/Paste as New Image....this will merge
the layers together, but will also let you save the original as a psp.image so it can be used again in the future if you want too.
Well, I think that's about it.....just remember to take your time, but also, use your imagination and be creative!
I hope this was easy to read, understand and follow. I would love to hear any feedbacks...rylee1966@gmail.com
Thank you for trying my tutorial!
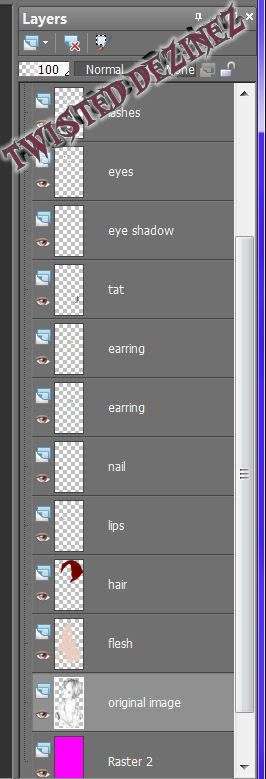
just a screen shot of my layers palette.
Subscribe to:
Post Comments (Atom)
About Me

- Joanie
- I'm better know as "RyLee" in the PSP Community. This is my little corner of the world where I share tags that I make in Paint Shop Pro/Animation Shop. I am self taught, about 9 years now. I learned by searching n searching for tutorials on how to make tags...finally it all sank in. I hold a license to use Barb Jensen, (my first license), CDO (CILM), Jose Cano, Up Your Art, PTE, AIL, My Tag Art, Pics for Designs....I know I'm forgetting one or two. I love pinup art, nudity does not bother me....we were all born with (@)(@). I love taking pictures, baking n cooking, looking at eyes....looking into someone's eyes... If you want to check out a few tuts that I wrote, please visit my other blog: www.tutorialsbyrylee.blogspot.com/ If you need me, contact me at: rylee1966@gmail.com


0 comments:
Post a Comment